
Face-Framing Layers: Choose Where the Shortest Pieces Fall
Face-framing layers are shorter front pieces that shape the outline around your face. Choose where the shortest pieces should fall when dry, then check what you need to tuck, clip or tie back. Curtain bangs are a fringe option, not another name for every front layer. You can keep your forehead open and still have a clear frame around your cheeks, chin or neck.
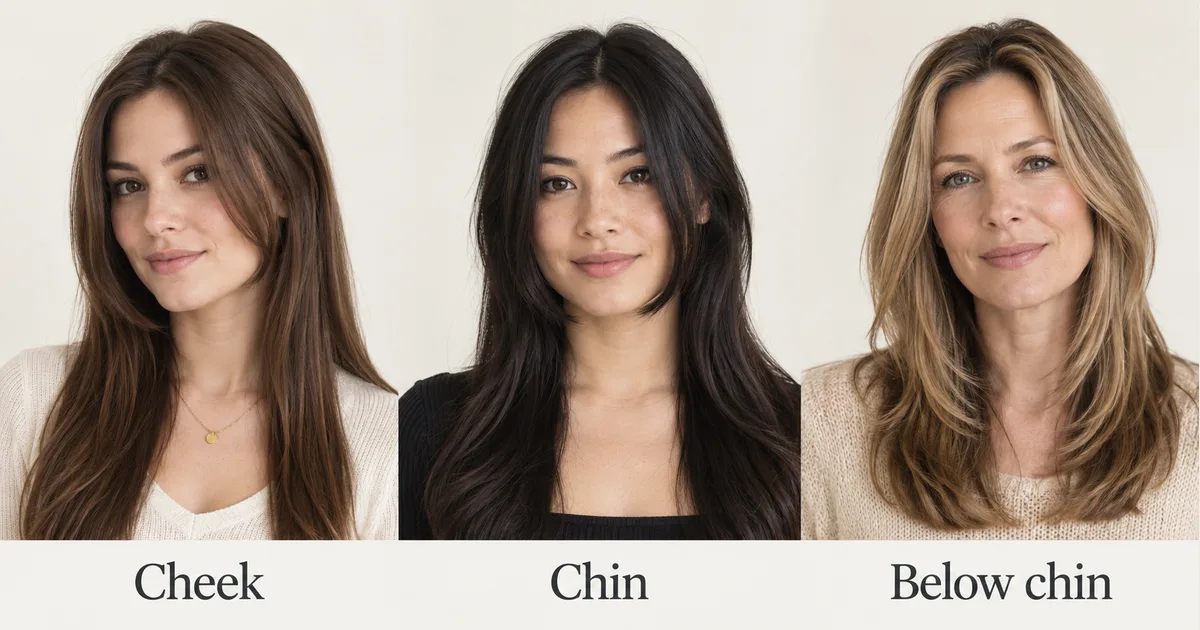
Generated editorial illustration comparing endpoint ideas. These are not Naee outputs, real transformations or face-shape prescriptions.
The most useful request is not simply “give me layers.” It is “let the shortest front piece rest here, in the finish I usually wear.” A reference photo can show a lifted, outward sweep while your everyday hair falls toward your face. Those are different starting points for the same apparent length.
Publisher disclosure: This is the Naee blog. We have a commercial interest in Naee. App descriptions below come from official sources, not an independent accuracy test, and no illustration in this article is actual app output.
Table of contents
- What face-framing layers change
- Compare cheek, chin and below-chin endpoints
- Curtain bangs vs face framing layers
- Check tuck, clip and ponytail constraints
- Adapt the amount of layering to texture and ends
- Preview the front shape and write a salon request
- Common mistakes to avoid
- FAQ
What face-framing layers change
A front frame changes the pieces closest to the face. It can create a gradual diagonal from a short front endpoint toward the longer perimeter. It does not automatically mean shorter layers through the crown, back and sides of the entire haircut.
NATULIQUE's stylist-oriented guide, created with salon owner and colour educator Anna Bjørnstrup, describes this localized placement and distinguishes it from curtain fringe. Its useful consultation point is to decide the shortest point before cutting and check the result with the hair dry. That is terminology and planning guidance, not a reason to copy its professional cutting steps at home.
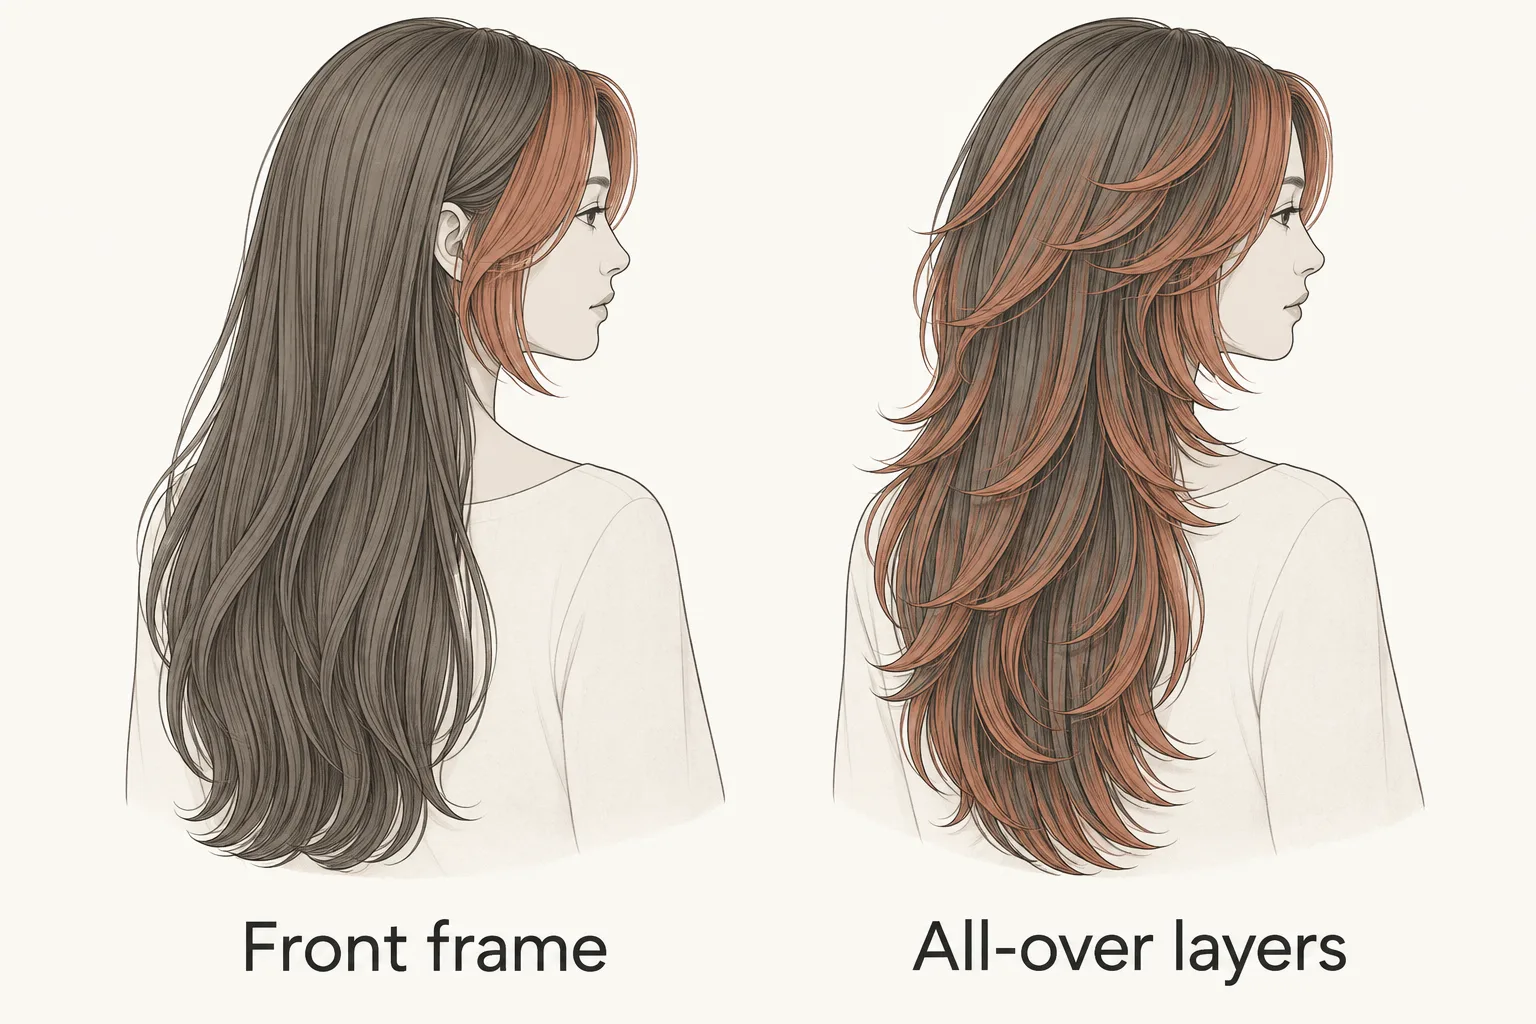
Generated editorial illustration. The highlighted areas distinguish localized front framing from distributed layering; this is not a technical cutting map or Naee output.
Keep three decisions separate:
- Front endpoint: where the shortest visible piece rests.
- Amount of front hair involved: a narrow frame or a broader sweep.
- Rest of the haircut: retained length, all-over layers or another connected shape.
A butterfly haircut may combine a prominent front sweep with layering elsewhere. That whole-head structure is a different decision from adding a modest front frame to an otherwise simple perimeter. Say explicitly if you want the crown and back left mostly alone.
You also do not need to change colour. Lighter front sections can emphasize an existing outline, but colour placement and shorter pieces are not interchangeable. If you like a highlighted reference, identify whether you want its cut, its colour or both before a stylist interprets it.
Compare cheek, chin and below-chin endpoints
Use the dry resting point as your reference, not a stretched wet strand or the highest point in a styled flick. Look at your front hair in its ordinary part and finish. Then point to the place you want the shortest tip to reach without pulling it tight.
The examples below illustrate three directions. They do not establish a universally best endpoint, and the generated people are not controlled before-and-after comparisons of the same haircut.
Cheek-level pieces: a more noticeable short front
Cheek-level framing places the shortest pieces close to the eyes and upper cheeks. When swept outward, those tips make the change visible even if the main length stays long. When they fall inward, they may sit closer to the face than a reference's blowout suggests.
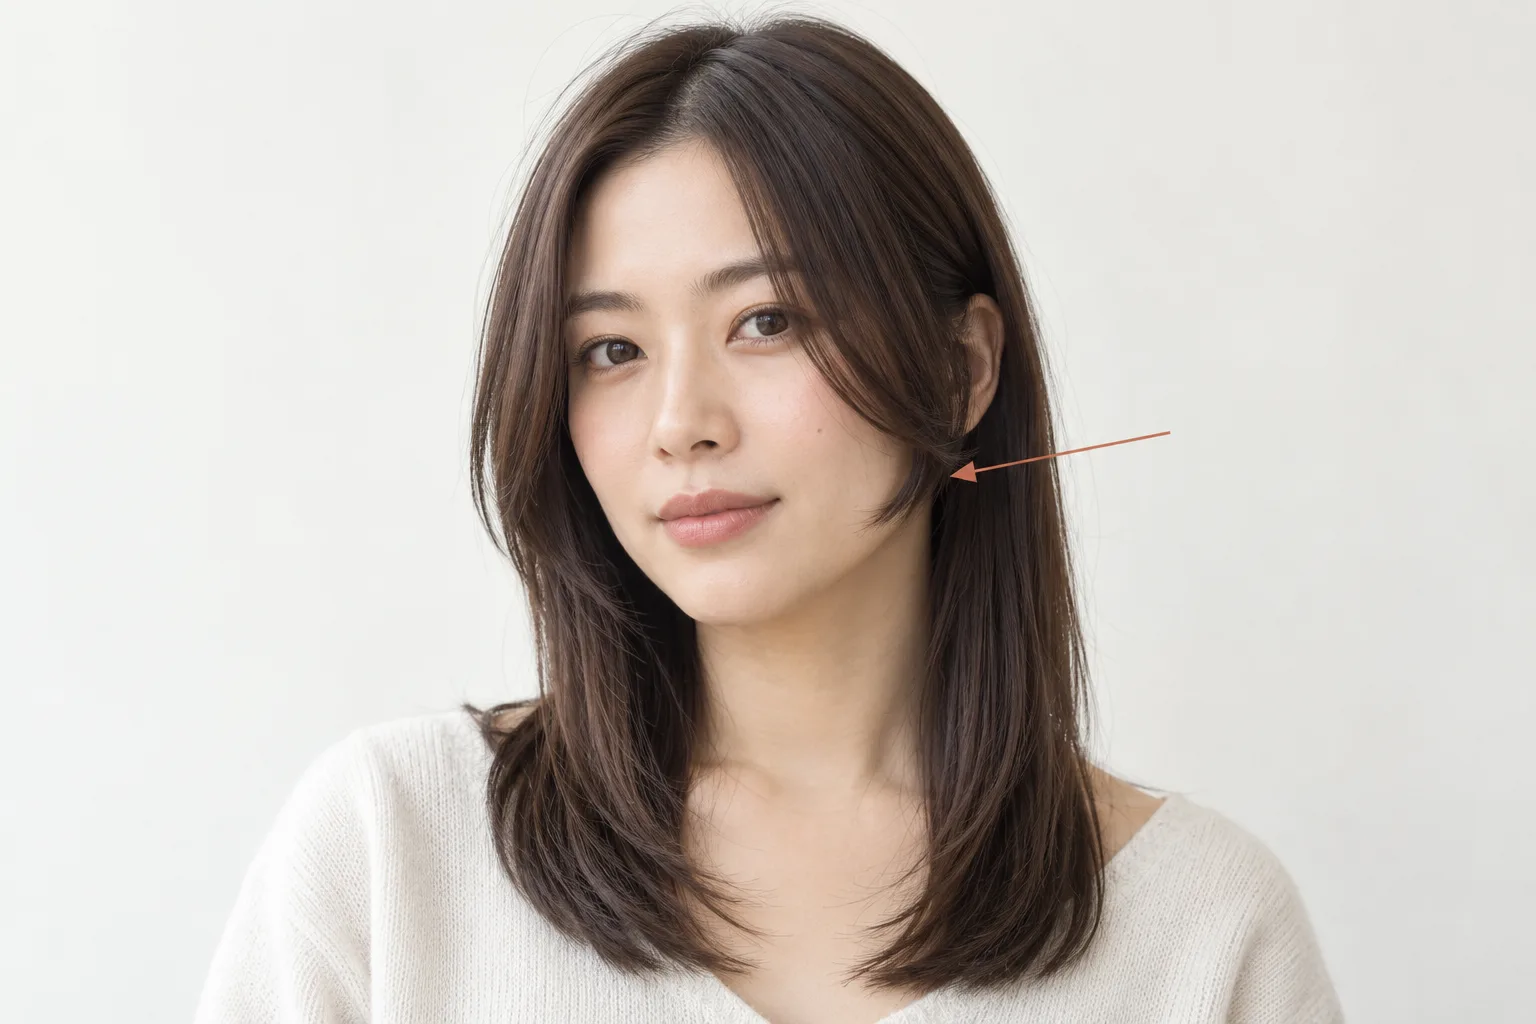
Generated editorial illustration, not Naee output or an actual haircut result. The arrow identifies the illustrated cheek-level tip.
Ask how this endpoint behaves in your usual finish and whether you are comfortable leaving some front pieces loose. A short outward sweep might require directing or restyling the front. Choosing cheek length does not guarantee lift, effortless movement or that the pieces will stay behind your ears.
Chin-level pieces: a clear lower-face reference
A chin endpoint gives you an easy landmark to discuss. The front can connect into longer hair while keeping the forehead open. Specify whether “chin length” means the relaxed tip beside the chin or a bent tip that appears higher after styling.
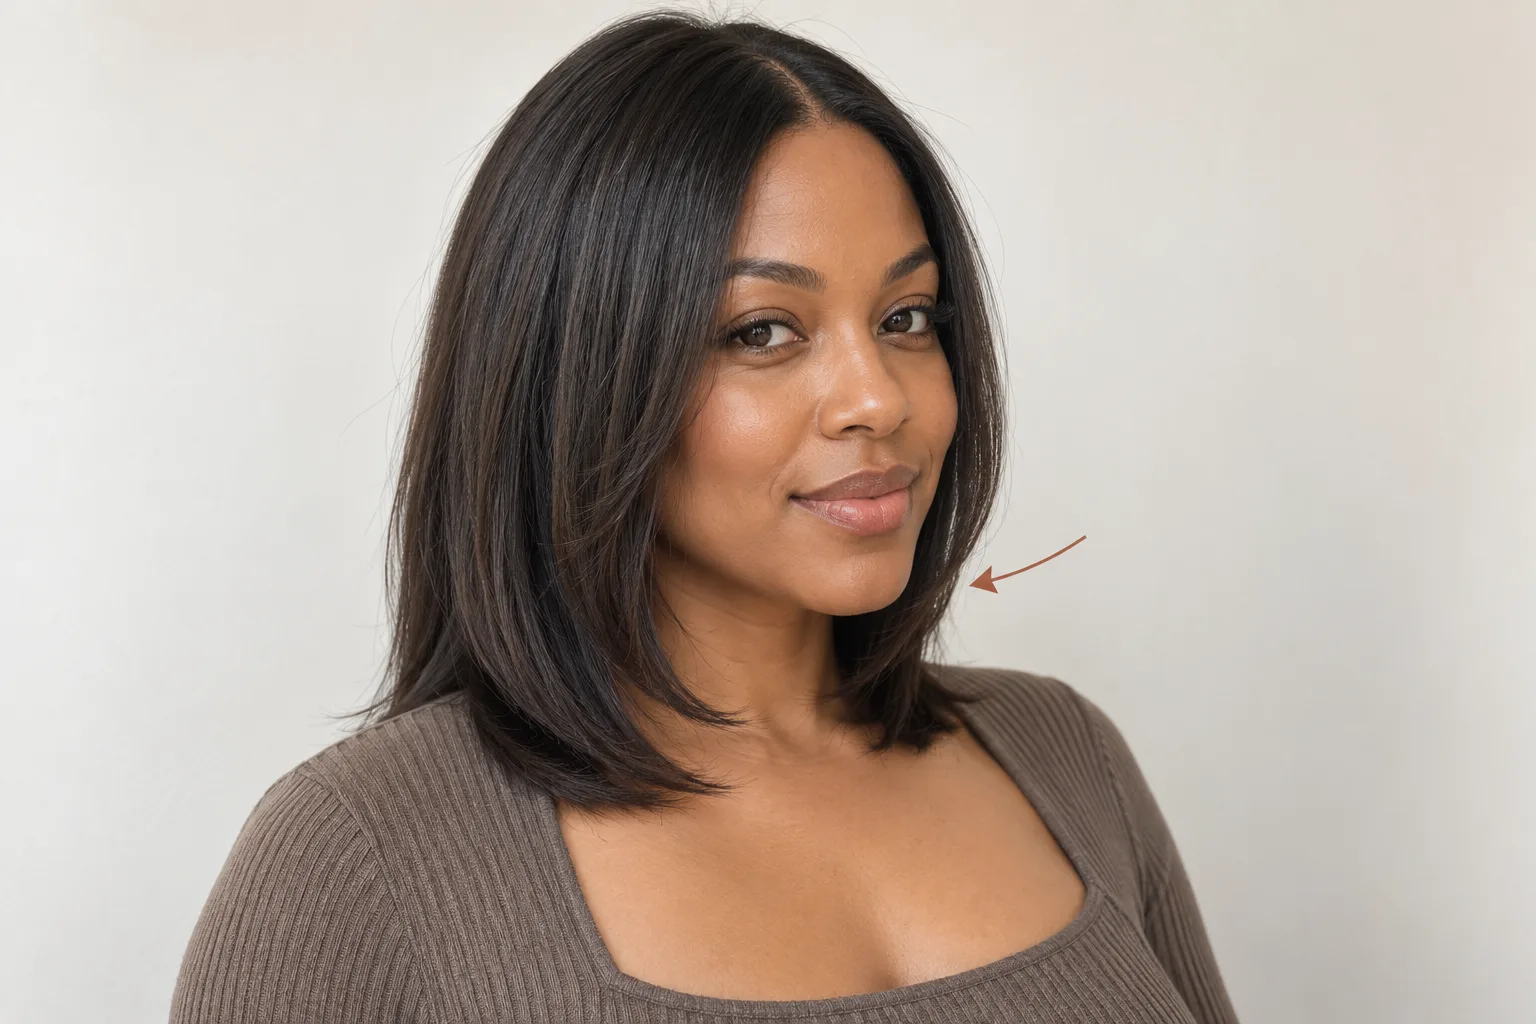
Generated editorial illustration, not Naee output or a real transformation. The arrow marks a conceptual chin endpoint.
A useful request is “chin when dry, with my usual part, without a large round-brush sweep.” This names the mechanism behind the reference rather than assuming the photo's finish comes with the cut. Chin length still needs an actual tuck or clip check; the landmark alone cannot certify either.
Below-chin pieces: a longer frame without fringe
Starting below the chin can keep more length in the front section while creating a gradual connection to the shoulders or collarbone. It is a sensible direction to discuss when you want an open forehead and less emphasis on short front pieces.
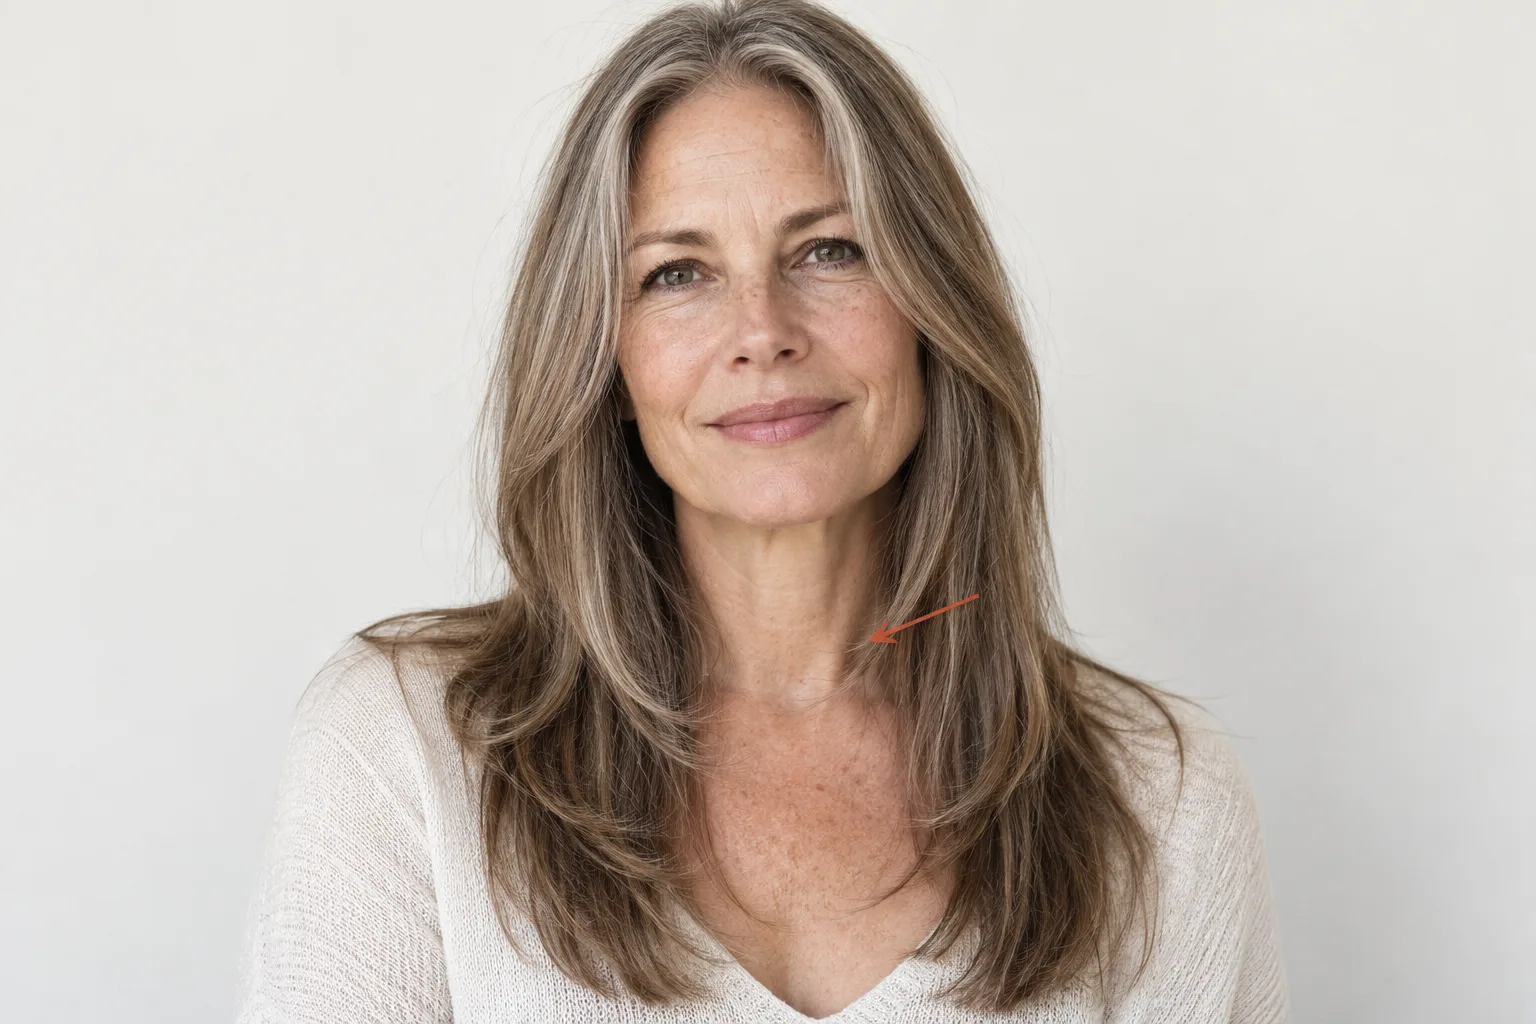
Generated editorial illustration, not Naee output or a prediction. The arrow identifies the longer starting point.
Do not turn “longer” into a promise of no maintenance. A front wave, cowlick or shoulder-level bend may still change the way the pieces fall. Ask the stylist to show how the longer frame connects in your natural finish, not only after smoothing it.
| Endpoint direction | What to notice | Question before committing |
|---|---|---|
| Cheek | The front change sits higher and is more conspicuous | Am I happy with loose pieces and any styling needed to direct them? |
| Chin | The shortest tip has a clear lower-face landmark | Where does it rest dry, and can I secure it the way I normally do? |
| Below chin | More front length remains before the frame begins | Is there enough visible shaping for my goal without sacrificing useful length? |
Face-shape labels should not overrule those questions. Hanzo's layer comparison usefully separates front framing from general layering, but it also advises against framing round faces. That blanket exclusion is supplier advice, not a universal rule. NATULIQUE discusses adapting frames for round faces instead. Neither source establishes a single required outline for everyone with the same face label.
Choose what you want to emphasize, how you want the hair to move and what your routine permits. You do not need to make your face appear narrower to justify a haircut you like.
Curtain bangs vs face framing layers
Curtain bangs are a fringe that parts and sweeps away near the forehead. Longer face framing can begin around the chin or below it without creating a fringe at all. They can coexist, but you should not request one while expecting the other.
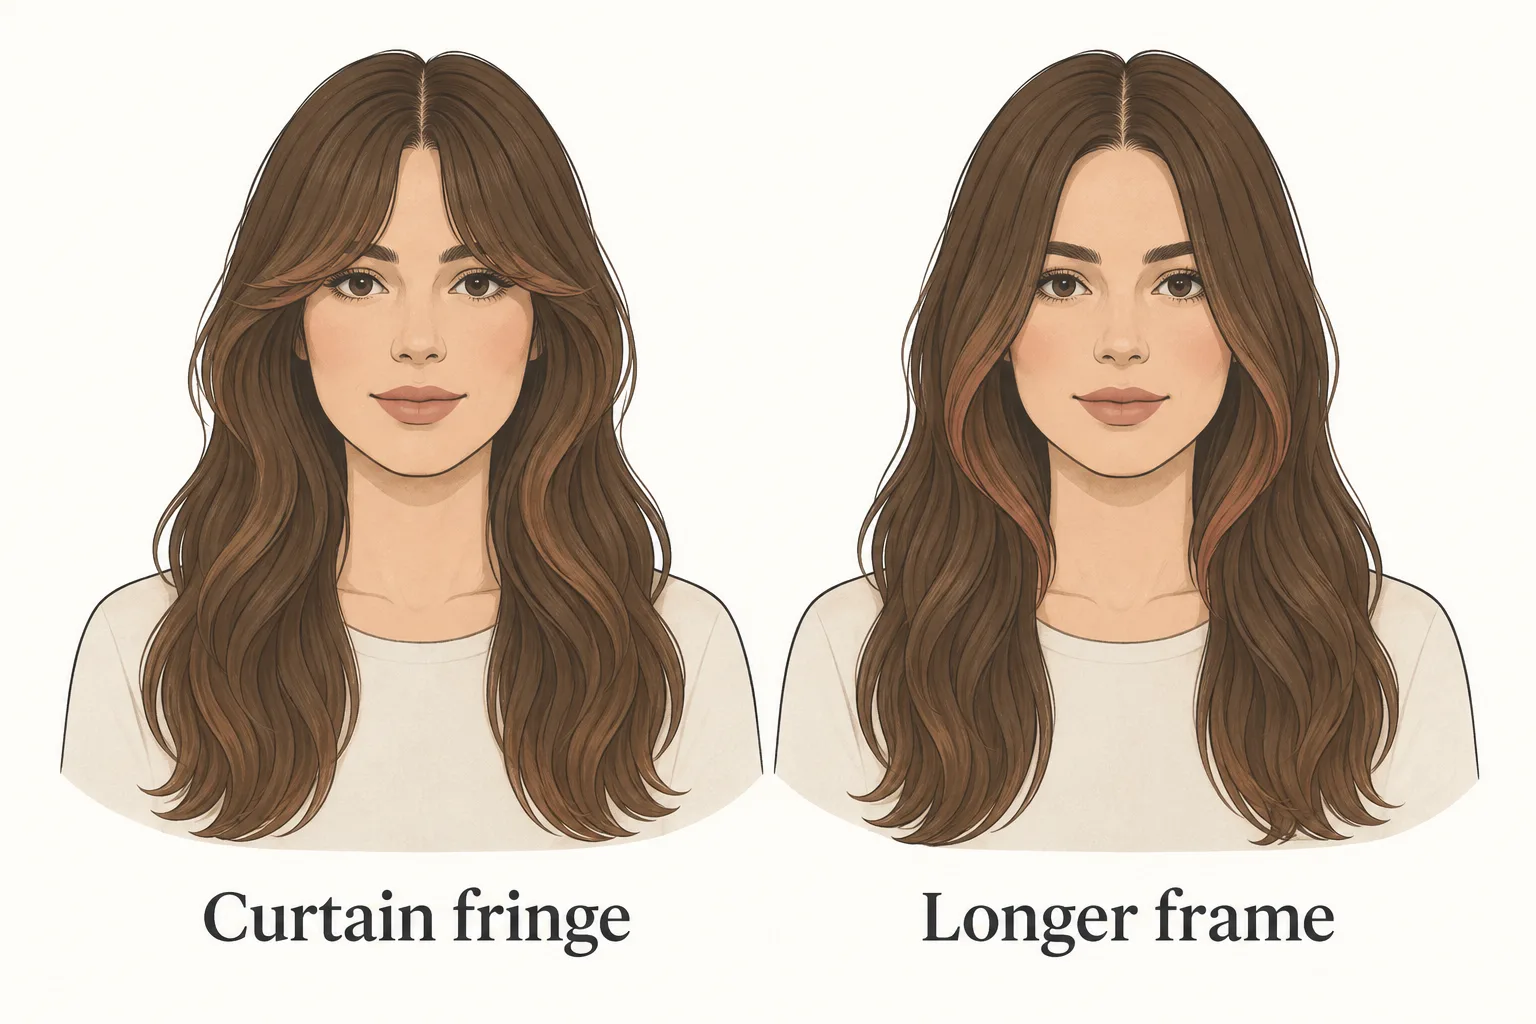
Generated editorial illustration of the fringe-versus-frame distinction, not Naee output, a makeover or a guaranteed dry shape.
Ask “Do I want hair living across or close to my forehead?” before looking at the longest side pieces. A curtain fringe reference may have long edges that resemble layers, but its shorter central section is the commitment you need to understand.
| Decision | Curtain fringe | Longer front frame |
|---|---|---|
| Short central section | Present as part of the fringe | Not necessary |
| Open forehead | Depends on the sweep and how the fringe settles | Can remain fully open |
| What to specify | Shortest centre, longest side and normal part | Shortest front endpoint and connection into length |
| Routine question | Will I redirect the fringe after sleep, washing or exercise? | Will the front fall as I want without the reference's styled bend? |
Avoid the common instruction “curtain bangs, but no bangs.” Say instead “no fringe across my forehead; keep the shortest front pieces at the chin.” Bring a reference and point out which part you do not want. Terminology varies between salons, so a visible landmark and an explicit exclusion are clearer than a label alone.
Check tuck, clip and ponytail constraints
A frontal picture cannot prove that the shortest pieces reach your ear or a ponytail elastic. It hides the distance around the side of the head, the placement of the elastic and how strands spring back when released. Even two frames with the same apparent endpoint may secure differently.
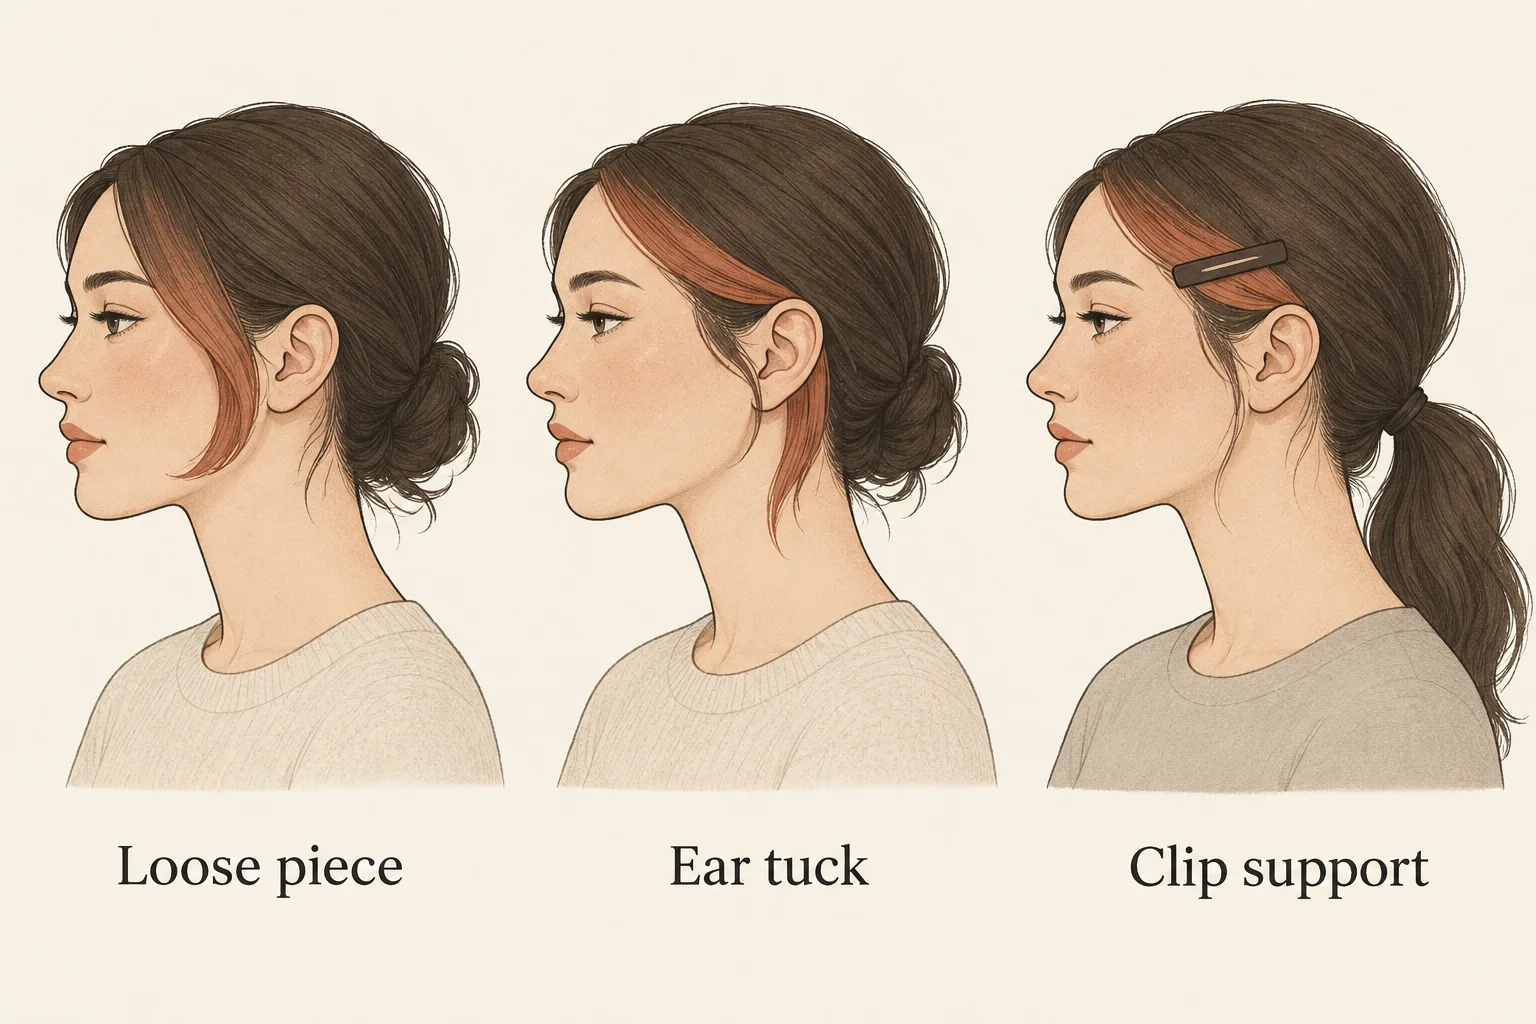
Generated editorial illustration showing different securing methods, not Naee output. No panel guarantees a particular endpoint will pass a tuck or tie-back test.
Use this practical constraint matrix with your stylist:
| Your routine | Demonstrate this | Clarify the acceptable tradeoff |
|---|---|---|
| Hair behind ears at work | Your actual ear tuck, then release your hands | Are loose tips acceptable, or must everything stay back? |
| Glasses or headset | Put them on with the hair in its normal position | Can front pieces sit comfortably without repeated adjustment? |
| Exercise ponytail | Your normal elastic height, not an unusually low substitute | Can short pieces remain loose, or do you need clip support? |
| Face clear for cooking or work | The clip or barrette you actually use | Is using an accessory most days acceptable? |
| Mostly air-dried hair | The front in its unstretched, dry shape | Are natural bends welcome, or would they lead to unwanted styling? |
Do not treat adding a clip as a failed haircut. It is a valid choice if you like the shorter front and do not mind an accessory. It is the wrong compromise if your non-negotiable is putting all your hair up with one elastic and no extra attention.
Our low-maintenance medium-length haircut guide treats ease as a routine decision rather than a property of a haircut name. Apply the same idea here: define what “easy” means before shortening the front.
Adapt the amount of layering to texture and ends
The shortest point is only half the request. How much hair joins that shorter section changes the result. A broad frame removes more front length than a narrow frame, even when both begin at the chin.
Fine-looking or sparse ends: preserve the outline you need
Fine describes individual strand diameter, not the number of strands. If your current ends already look lightly separated, ask whether a narrow, longer frame can provide the change you want while retaining enough hair at the perimeter. Do not assume every fine-haired person needs the same amount of layering.

Generated editorial illustration of restrained framing, not Naee output or a measurement of density. The pictured strand separation is conceptual.
Ask the stylist to assess the front section and ends in person before agreeing to a broad sweep or extensive thinning. Shortening more strands changes how much hair reaches the longest edge; it does not create new density. For the larger silhouette decision, see choosing hairstyles for fine hair.
Waves and curls: check the relaxed dry shape
A wave can place a tip higher or farther outward than a straight strand of the same stretched length. Front sections may bend differently from the back. Use the finish you normally wear as the baseline and ask how the frame will be checked after it settles.
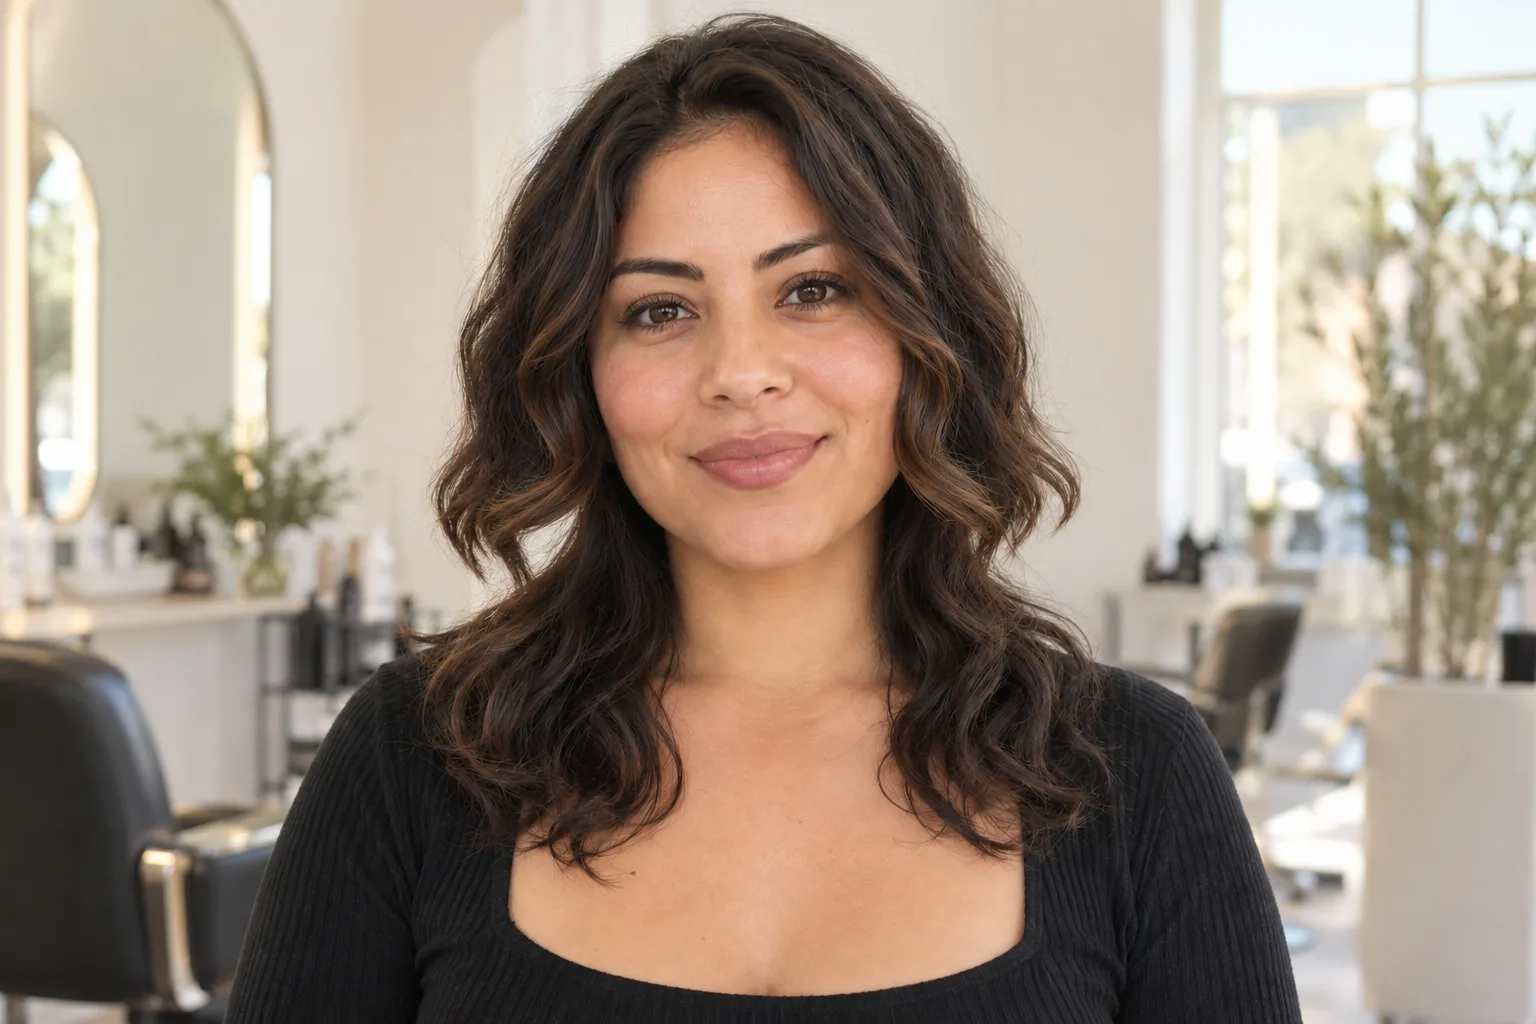
Generated editorial illustration of a wavy front frame, not Naee output, a real salon result or a promise that waves will dry this way.
For stronger curls, show the stylist the front curl pattern without stretching it into a new reference length. Explain whether you welcome a shorter curl near the cheek or want the relaxed front to stay below the chin. There is no universal extra-length allowance that this illustration can provide.
Our haircuts for wavy hair guide covers the wider relationship between bends, perimeter and routine. Here, the narrower goal is to choose a front endpoint without assuming a photographed wave will repeat on your own hair.
Preview the front shape and write a salon request
If you use a preview, change only the front framing direction first. Keep the colour, overall length and usual part similar, and request an ordinary finish. Otherwise, a new colour or a fuller crown can distract you from the endpoint you intended to compare.
The official Naee website describes own-photo hairstyle previews, reference-photo style cues and saving favourites. Its accuracy FAQ says previews are not guaranteed exact matches to salon results. The App Store listing describes Stylist Mode and limited trial credits, with subscriptions or credit purchases for continued generation. Check the current purchase screen rather than assuming unlimited free variations.
A useful request is: “Keep the overall length and colour. Show an open forehead and a narrow front frame beginning at the chin, with my usual part and modest everyday texture.” This states an intention, not a guarantee the generator will follow it. Compare the output with your original and check whether the face, hairline, part or apparent fullness changed. Our face-preservation checklist helps you separate those changes from the haircut idea.
For reference-photo input, the guide to copying a hairstyle from a photo explains how to distinguish cut cues from styling. A preview can help communicate a preference; it cannot test actual tuck-back reach, movement, dry curl behaviour or hair density.
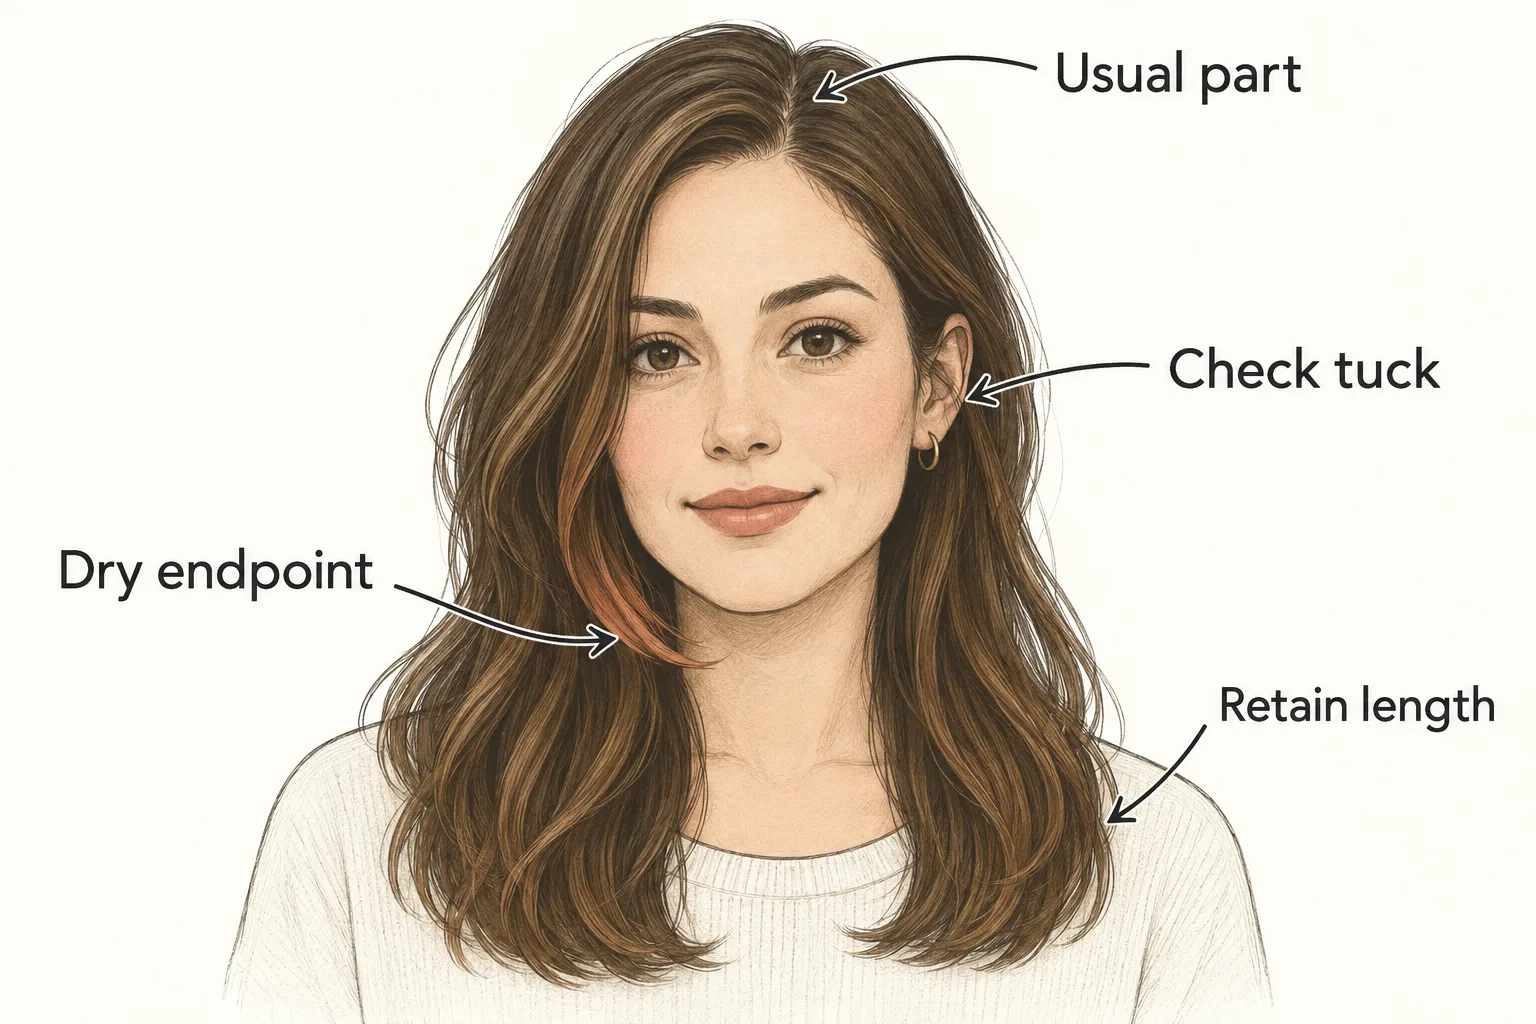
Generated editorial illustration of a salon discussion brief, not Naee output or a cutting instruction. Confirm every constraint on your real hair.
A hypothetical request with one clear compromise
Imagine Lena, a fictional reader with collarbone-length, lightly wavy hair. She wants an open forehead, wears glasses and ties her hair into a low ponytail for work. She likes a cheek-length sweep in one reference, but she does not want to use a clip every workday.
Her shortlist is a cheek endpoint and a below-chin endpoint, shown in a modest finish. She does not rank them with a photo-derived “suitability score.” She asks a stylist to check how much front hair can be shortened while preserving her normal tie-back routine. If the cheek version requires loose strands or a clip, she can choose that knowingly or keep the longer direction.
Her brief could read:
“I want a narrow front frame with no fringe across my forehead. Start by discussing a below-chin dry endpoint in my natural waves, and keep the rest of the length. I need to use my usual low ponytail without a separate clip. Please check that constraint before we settle on the shortest front piece. I like the reference's outline, not its extra lift.”
Bring your unedited photo, a small number of references and any preview clearly labelled as generated. If you want to explore a front-shape idea first, you can download Naee for iPhone, then take the idea and its uncertainties to a stylist. The consultation, not the rendered image, decides the practical adaptation.
Common mistakes to avoid
- Choosing the shortest point from a blowout alone. A styled bend can lift the tip. Name where you want it to rest in your ordinary dry finish.
- Requesting layers without defining their area. Specify front only if you do not want crown and back layering as well.
- Assuming long side pieces mean no fringe. Check the shortest central piece in a curtain-bang reference.
- Treating a face label as permission or a ban. Compare the outline you enjoy and your practical constraints instead of accepting a universal rule.
- Inferring function from a frontal preview. Demonstrate the actual tuck, clip or ponytail on your real hair.
- Expecting the photograph's density or movement. Separate an appealing endpoint from generated fullness and professional styling.
The takeaway: Decide the dry endpoint, the amount of front hair involved and the routine you will not compromise. Those three choices make “face-framing layers” a useful salon request rather than an ambiguous picture.
FAQ
Can I get face-framing layers without bangs?
Yes. A longer front frame can begin at the chin or below it while leaving the forehead open. Say “no short fringe across the forehead” and identify the shortest dry endpoint so the stylist does not interpret your reference as curtain bangs.
Where should the shortest face-framing layer end?
Choose a visible landmark such as cheek, chin or below chin, then check it in your normal dry texture and part. There is no mandatory endpoint based on one face-shape label. Your preferred outline and securing needs should guide the discussion.
Do face-framing layers work on round faces?
A round-face label is not a universal reason to exclude them. Different starting points, section widths and finishes create different outlines. Discuss the frame you like rather than assuming you must make your face look longer or narrower.
Will face-framing layers stay in my ponytail?
A photograph cannot guarantee that. The shortest strands must reach your actual elastic placement and stay there when released. Demonstrate your normal ponytail before choosing the endpoint, and state whether loose pieces or clip support are acceptable.
Are face-framing layers automatically low maintenance?
No. Your part, front growth direction, texture and preferred finish determine whether you will redirect or secure the pieces. Ask how the frame behaves without the reference's blowout and what upkeep the specific shape needs. Do not treat a haircut name as a styling guarantee.